Sunday, 21 April 2013

Rainy Day Umbrella Craft

It was raining this morning and Master E wanted me to sing him a rain song. All I could remember at the time was this one:


Rain is falling down, 
Pitter-patter, pitter-patter, 
Rain is falling down.


He was suitable impressed, (luckily for me!) and we have been singing it on and off all day. Which is where the inspiration for today's craft came from. I have been thinking about making umbrellas for awhile and today's weather really did lend itself to making them. They are super easy and we used all things we already had.

We started with

Paper Plates
Dot Painters
Pipecleaners
Sticky Tape (I intended on using staples but the kids were have too much fun with the sticky tape!)
Ribbon Scraps
Blue Card
Scissors

Before we started I cut a paper plate in half with a zig zag pattern to form the top of the umbrella.

We then used the dot painters to decorate our umbrellas. I love these as they are technically still painting but there really is hardly any mess and set up is so quick.

A decorated umbrella. While Master E and Miss M were busy decorating I cut some of the card into rain drop shapes. I wasn't very fussy so the shapes and sizes were rather varied.

While we waited for the umbrellas to dry we used sticky tape to tape raindrops onto pieces of ribbon. Master E loved the challenge of using the sticky tape.

Once we had taped a number of raindrops onto each ribbon we taped the ribbons to the back of the umbrellas and added a pipecleaner for the handle. 

Miss M's finished umbrella. 

And Master E's.

We would love to see any of your rainy day crafts!

Saturday, 13 April 2013

Threading with Leaves ~ Simple Cost Effective Crafting!

We had a visit to a lovely park this week and managed to come home with a great collection of leaves. I had previously seen a wonderful post on threading with leaves from A Little Learning for Two and decided we would have a go too!

We used:
Leaves
Curling Ribbon (I seem to have an abundance of this!)
Child friendly Needles 
Scissors


We started by removing all the leaves from the twigs we had collected. 

I cut off lengths of curling ribbon and tied a knot at the end to prevent the leaves from all slipping off and attached the child friendly needle at the other.

We then got busy threading, the needles pushed through the leaves quiet easily and is great for fine motor development and hand eye coordination. We used eucalyptus leaves so there was also a lovely scent when the leaves were pierced.


Once we had enough threading I tied the ribbons off to make a necklace. This is Master E with his beautiful necklace.

A very proud Miss M showing off her necklace.


We had lots of fun with this one and it was soooo easy and very cost effective too. Next time we might add some flowers into the mix!

Wednesday, 13 March 2013

Super Cute Easter Bunny Masks

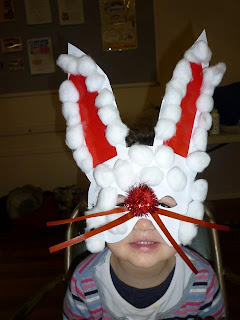
Easter is fast approaching and the Toddler Timers and their friends are super excited, so there are lots of Easter Crafts happening. Today we made some very cute Easter Bunny Masks.

We started with:

Cardstock
Coloured Paper ~ Cut into shapes to place inside the ears and strips for whiskers.
Thin Elastic
Cotton Balls
Pom Poms
Glue Sticks


I did a fair bit of preparation for this craft. I started by creating a rabbit mask template. I cheated a little bit and found a mask the Toddler Timers had in their dress ups and used this to get the face and eye shapes, then I just added the long ears to make rabbits!

I precut the masks all out as this would take too long and be too difficult for most of the kids. I find using a scalpel much easier than scissors when cutting out inset shapes, like the eyes

I also had hole punched and threaded elastic into the masks. 

The Toddler Timers then choose a colour to paste into the ears and covered their masks with cotton balls.

Miss M carefully adding the colour to her bunny's ears.

Miss A working hard.

Miss A using her fine motor skills to separate the cotton balls ready to paste on to her mask.

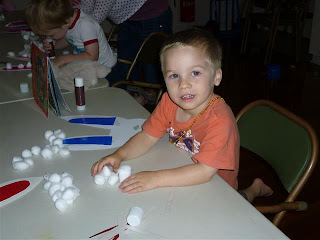
Master E stockpiling the cotton balls.

Little Miss S keen to have a go like the big kids.


Miss A deep in thought.

Master S trying his mask on for size.

Miss L hard at work.


The gorgeous Bunny Miss L. Once we had finished adding the cotton balls we added some strips of paper for whiskers and  a Pom Pom for a little Bunny nose.


Master J making a super cute Easter Bunny.

The lovely Bunny Miss O.

The cheeky Bunny Master E.

The gorgeous Bunny Miss G.

Little Miss M having a turn of her big Sister Miss A's mask.

Miss A making a lovely Easter Bunny.

Miss M very proud of her mask.
The children really enjoyed making these and when we were finished there were some very cute little Easter Bunnies hopping around.

Tuesday, 12 March 2013

Easy Easter Egg Craft!

Looking for a simple messy free Easter Craft? This is by far one of the easiest I have done.

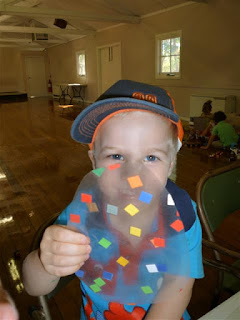
We started with some clear contact, I cut it into large rectangles and then folded it firmly to make a crease in the middle. Open half of the contact up to the creased point and then added pre-cut mosaic squares (tissue paper would also work well). Once the children had enough decorating we shook off any loose squares and covered them over with the remaining contact. An adult then cut them into Egg Shapes and there it is Ta Da! Easy peasy Easter Eggs!


Miss L very carefully choosing where to place her squares and working on some great Fine Motor Skills!

Miss A adding lots of colour.


Folding the contact over and pressing it down firmly. 

So easy even Miss S was keen to give this one a go!

Miss A very proud of her finished Easter Egg.

Master E showing off his handy work.
 
A very proud Miss G!

Sunday, 3 March 2013

Jelly Fish

At a recent trip to the beach we came across some gorgeous Jelly Fish which proved to be very inspiring for a craft activity. This activity took a little bit of preparation, but I am sure you could make modifications so it wasn't as time consuming. The craft itself is simple.


We used:
Empty Yoghurt Containers ~ Large ones which I pre drilled holes in
Glue Sticks
Tissue Paper ~ Cut into squares
Curling Ribbon
Cellophane ~ Cut into long strips
Sticker Dots


The gorgeous Jelly Fish that inspired our craft.


I started by drilling four holes into a plastic yoghurt container. These holes were to thread the cellophane through to have lots of hanging tentacles.


I also drilled a hole in the top of the container and tied some curling ribbon through so that there was a handle to carry or hang the Jelly Fish with.

We then used tissue paper to cover the yoghurt container, threaded the cellophane through the holes and embellished with some sticker dots.


Jelly Fish hanging up and decorating our kitchen!

Fabulous Fish

Another weekend spent at the beach so another beach inspired craft. These fish are super easy, require minimal preparation and are very toddler friendly.

We used:
Paper Plates ~ smallish ones which were great as they didn't take long and the kids didn't loose interest
Patty Pans ~ I cut these into halves or the larger ones into quarters
Glue Sticks
Sticker Dots ~ We added these for eyes but you could add googly eyes or just draw the eye on
Stapler
Scissors


I cut approx a quarter out of the plates to make a mouth opening and used the left over piece to form the tail.

Attach the left over quarter to the opposite side of the mouth using staples.

We then used glue sticks to paste the cut up patty pans all over our fish, they made brilliant scales as they didn't sit completely flat.

One of our very cute fish.
The variations of fish created, many scales verses minimalist.


Our completed school of fish up at Playgroup.